So Fresh and So Green!

Spring has sprung in Vermont and we are excitedly readying the Bed and Breakfast for travelers to visit and enjoy the sights and sounds of our property this summer and fall. We had a very mild winter and spring, so we are already starting our garden with great success.

Along the pond, we have planted some new fruit trees that will start to bear fruit in the next few years. We are excited to grow our own fresh blueberries and currants that we can serve to our guests for breakfast. Guests will also be able to stroll along outside and taste these treats as they explore the Bed and Breakfast.  In addition to shrubs and plants, our chicks and ducklings have arrived, so we’ll soon have fresh farm raised eggs on the menu soon too!  (I’ll give a full update soon, but trust me when I tell you that they are adorable!)

"We believe there is nothing like biting into fruits and veggies that are so fresh they are still warm from the sun..."

One of the great things about visiting Vermont is being able to really get a sense of the flavors of the land. With so many local providers and sustainable farmers, there are delicious ways to tour the Green Mountains and explore the seasons while supporting local businesses. We believe there is nothing like biting into fruits and veggies that are so fresh they are still warm from the sun, and we aim to serve our guests at the Bed and Breakfast fresh, flavorful and seasonally appropriate dishes.

We have a 30x30’ garden (pictured above) that sits on the eastern side of the house. Every morning, the sun rises over the Green Mountains with its first rays hitting the garden and keeping it in sunlight through most of the afternoon and early evening. Because of the short growing season in Vermont, we started a lot of seeds indoors this year and built some raised beds to improve water drainage in the garden.

Gardening in early spring is always a little risky, especially in the mountains of Vermont, where the temperatures can drop low at night. (We think this makes for perfect sleeping conditions!) To protect our plants, we have covered some rows of the garden in straw to insulate them on a particularly cold night but really, this year is shaping up to be an incredible gardening season. We have had perfect temperatures so far and night time temperatures are holding above freezing. We have had some rain, enough to fill the rain barrels but so far not too many May showers.


Because we love to serve our guests fresh flavors of Vermont, we have planted fruits and veggies all over the place here at the B&B. There are some melon seeds that have sprouted inside under lights where they will stay until the weather warms up some more. We have our small greenhouse full of some habanero, jalapeno, and bell pepper seedlings and a few of the many heirloom tomato plants. In order to prepare them for the outdoor elements, we keep some plants on a rolling cart in the garage to stay warm at night and take them out daily to enjoy the sunshine.

The garlic we planted last October is coming up nicely, and last month we planted lettuce, spinach, radishes, and carrots. We also have some kale, Brussels sprouts, cabbage, and broccoli already planted. Normally our last frost date is somewhere around Memorial Day but we are keeping our eyes on the forecast daily. If conditions look good we will plant a few things under row covers to get a jump on the growing season. 


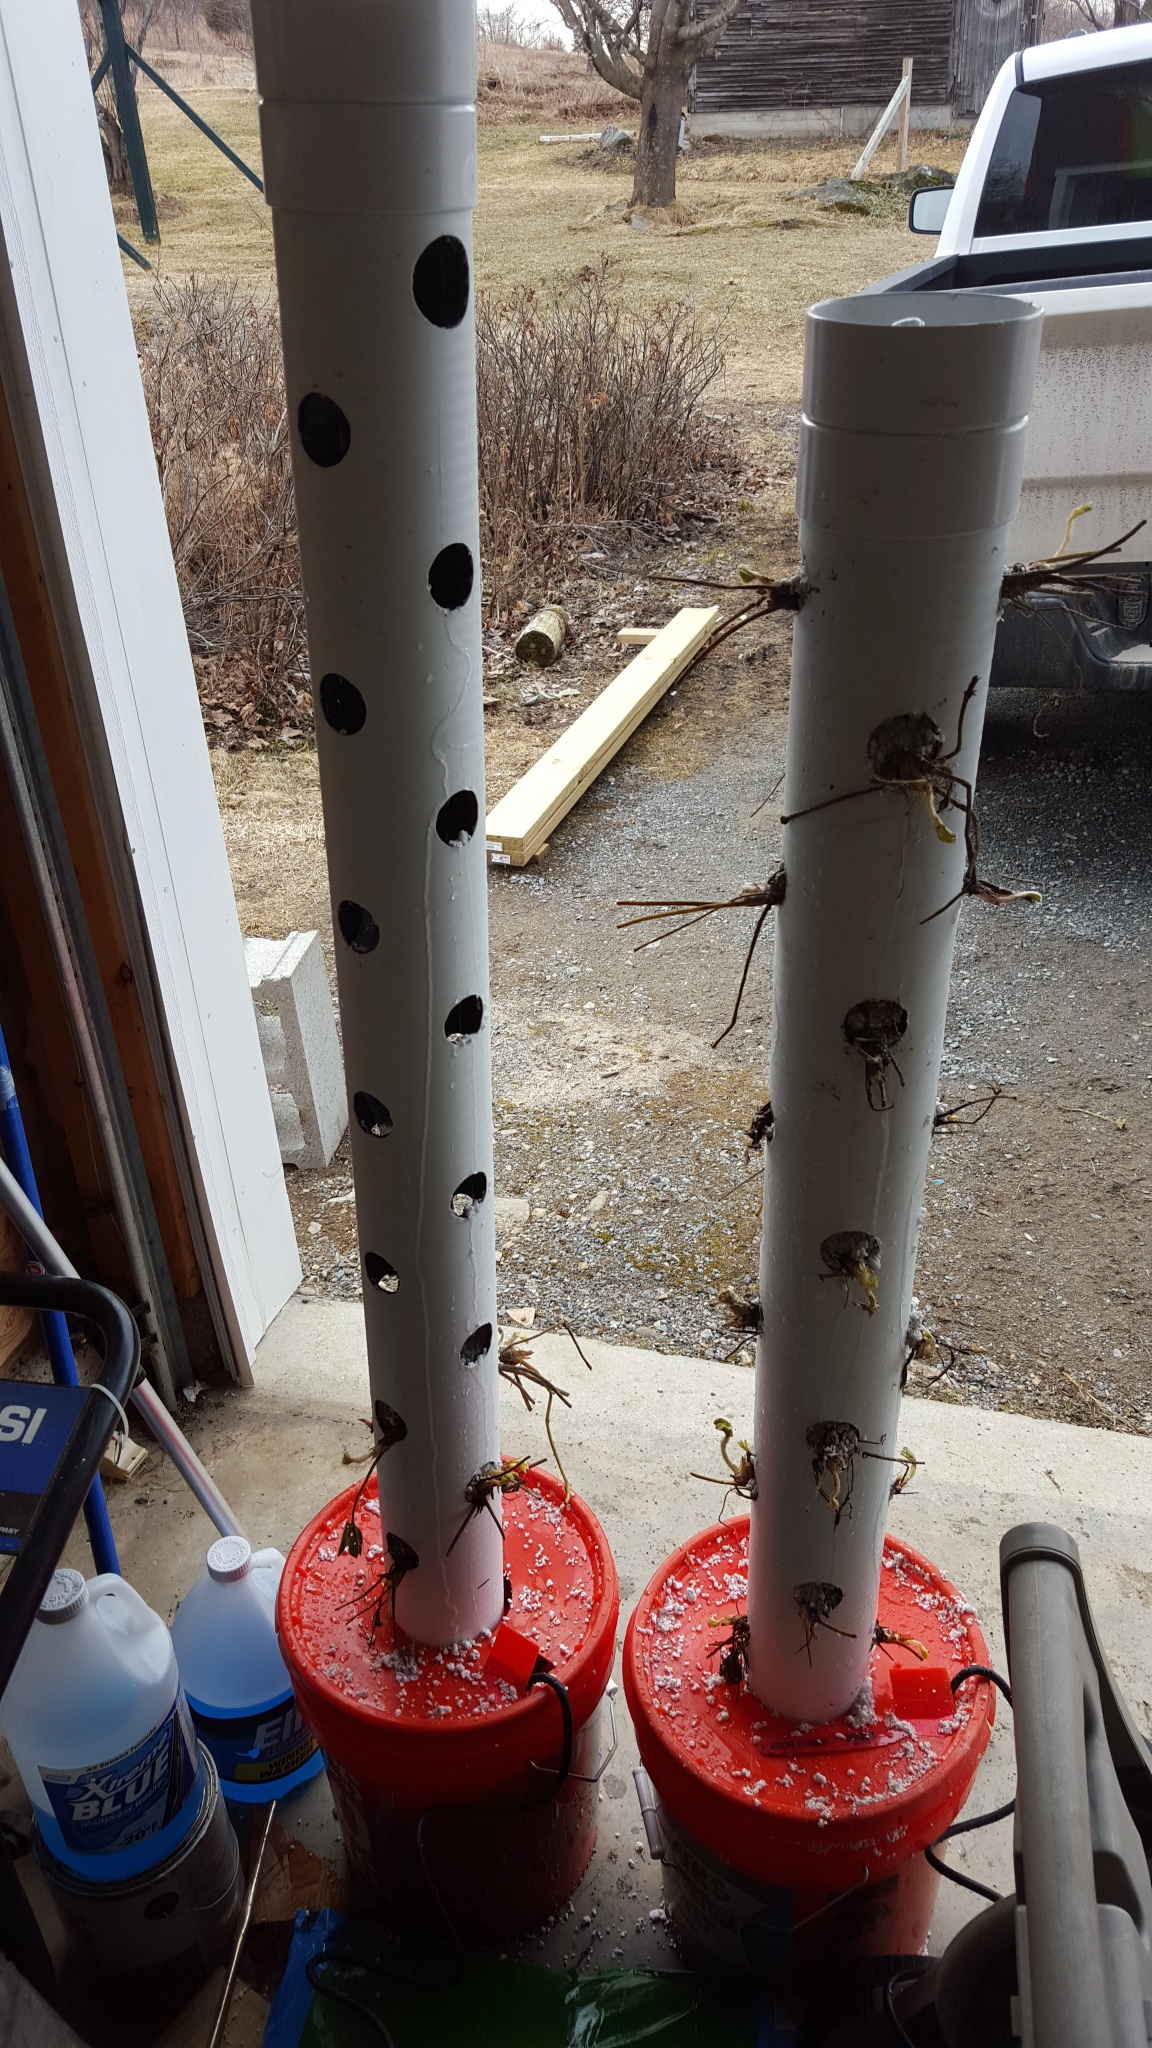
For those of you who read the strawberry tower blog, the strawberries are doing great! The towers have big and lush foliage popping out of every square inch of the pipe. It shouldn't be more than a few weeks before we start seeing small flowers emerge where the juicy red fruits will grow. We add a little bit of fertilizer that is specifically designed for hydroponic strawberries so they get all the nutrients they need. It seems to be working!  We’re excited to serve our guests fresh strawberries from our garden.

With all the veggies pretty much squared away, it's time to turn our attention to our flowers! 

-Luke & Carin McCarthy

DIY Project: Growing Hydroponic Strawberry Towers at the B&B

We go through a lot of fruit here at our Bed and Breakfast, from strawberries and blueberries on the side of our (soon to be) world famous French toast, to just having a bowl out at all times for guests to enjoy. Since we try to be as self-sustaining as possible, we are taking steps this spring to have some fresh, home-grown fruit this summer. We have some blueberry plants that will be planted in the coming weeks, and we are experimenting with growing our own strawberries using vertical planters. 

With all the veggies, flowers and fruits that we have planned for the garden this year there isn't going to be a lot of extra space left over. We already have to find a different spot outside of the garden for a few odds and ends like butternut squash and corn that need a little more room. We were determined though, to find space for strawberries because we love them!  With these space restrictions we started looking at vertical planters. After doing some research, we discovered that strawberries grow pretty well in hydroponic systems. Since we typically grow lettuce and other odds and ends through the winter inside hydroponically, we figured we'd give it a shot. 

After some on-the-fly engineering and design, we came up with the towers you see below. I'm mostly happy with the way they turned out but next year there are a few things I’ll change - which I’ll get to in a minute. 

DIY Vertical Strawberry Towers

DIY Vertical Strawberry Towers

To build them, we took a 4 inch PVC drain pipe and cut it in half, then drilled circular holes large enough for the strawberry root to fit though, about an inch across, in four columns up the side of the pipe in a staggered pattern. Be sure to measure out where the lid will sit once the pipe is seated in the bucket, and stop drilling your holes just above that. Then below that "lid line" we drilled a series of smaller holes down the pipe to allow water to flow back into the bucket. The bottom of the pipe is capped with a 4" cap and screwed into the pipe, so that when the season is over we can pull the whole thing out of the bucket without everything coming out the bottom! 

Now to the water pump. The whole premise of this system is that water is pumped to the top, and allowed to trickle down through the pipes, hitting each root as it flows down the tower. You need a good pump – I suggest a Baby Bear pump. Not too strong, not too weak, but just right. You'll need your pump to be able to push a column of water up at least 4 feet (the height of the tower) but you don't want it so strong that it overwhelms the system and overflows. We went with a 400 gallon per hour pump that claimed 300 gallons per hour with a 4 foot lift. After running the system it seems a bit less than that which is fine. 

You've got a few options here. You could plumb your two "tower buckets" together and have a third bucket as a reservoir with the pump in it, and then run your water line to a T fitting then to the tops of each tower; or opt for less clutter and get two pumps, placing one in each bucket, and run the waterline inside the pipes. This is the method we selected. After determining the length of hose needed to reach the top, we drilled a hole below the lid line that was as big as the waterline and fished the waterline through the hole and up the pipe. We then connected it to the pump in the bucket, put some water in it, and made sure we had a good flow rate to the top. 

The Pump & Water System

The Pump & Water System

To keep the pipe upright, we filled the bucket with a bag of crushed rock. Make sure to wash the rock first to keep dirt out of the system. Also be sure to fill the inside of the pipe with rock up to the lid line. The reason for this is we used perlite as our growing medium. Perlite floats and as such, it would be almost impossible to get a good base of perlite under the water line. Once you get above the water line with rock, start adding the perlite. Once you hit an opening, add the strawberry plants. Keep adding perlite and plants until you reach the top of the tower. 

For the top we took two 4" PCV caps and used PVC cement to glue them together. We then drilled a hole in the middle the exact diameter of the waterline and pushed the waterline through. We put the cap on the pipe and turned the pump on. The upside down cap starts filling with water and at that point just grab a small drill bit and go to town. Drill enough holes so the cap doesn't fill up and overflow. 

Drainage holes for the water system.

Drainage holes for the water system.

There you have it! In theory the system will work but I’ll check back with you in a month or so and let you know how it did! Since water and perlite don't have much in the way of nutritional value we will need to start adding nutrients to the water soon. Oh, and as for the things I would do differently: next year I won’t be using perlite as a medium. It's messy, it gets everywhere when you are filling the tower, and water has a tendency to create little rivers in it and those rivers always come out the holes. Next year we will switch to a hydroton medium. There’s always something to learn when you’re active on the farm!

- Luke McCarthy

Sustainable Green Mountains: DIY Farm Projects and Compost Systems at the B&B

We care a great deal about our environmental footprint and we try to keep a pretty low impact here at the B&B. Our electric source is solar, we hope to switch to a wood heating source soon, and we have always taken our recycling pretty seriously.

We are happy to share a greener experience with our guests who visit from around the world and want to see why the Green Mountains are extra special.

Vermont recently passed a mandatory recycling rule where, starting last summer, the disposal of recyclables was banned. Beginning in the summer of this year the disposal of leaf and yard debris will be banned; and 4 years from now the disposal of any food scraps will no longer be permitted. Go Vermont! We love that sustainability is a shared value in here.

The view of the Green Mountains from the front porch of our Vermont Bed and Breakfast

The view of the Green Mountains from the front porch of our Vermont Bed and Breakfast

We're proud to say we have also been recycling our food waste since day one. When we opened the B&B, the first (well, almost first) order of business was to build a compost bin near the garden to hold all the leaves, sticks, extra food, and garden waste. Let’s face it, while we serve up some pretty delicious breakfasts, serving up all those meals has a tendency to produce a lot of extra scraps. We like to think that the extra bites of French toast or eggs left behind on a plate can be cycled back into our garden and help us to feed our guests next year.

Our compost bins includes 3 compartments, which show "No vacancy" when they fill up!

Our compost bins includes 3 compartments, which show "No vacancy" when they fill up!

Here are some details about our DIY compost system:

Our main compost bin consists of three compartments, side by side. The two outer bins are 3 feet wide by 3 feet deep by 4 feet tall, and the center one is 4 feet wide by three feet deep by 4 feet tall. (The only reason for this different dimension is because lumber does not come in 9 foot lengths, so to avoid cutting extra material I made the overall length 10 feet!) The main framing is 2x4's and the whole thing is wrapped in 1/2 inch construction mesh. To keep the mesh in place, and to keep the sides from bowing out too I added some decking boards. To build the front I screwed a small spacer to the face of the 2x4 supports and then screwed a wider flat piece of wood to that, leaving a channel, then cut 1x6 stock to fit in the channel. The whole thing it topped off with 2x4 frame covered in polycarbonate panels, which was intended to track heat and keep it warmer so the decomposition process happens faster. If I were to do it all over again I may have left off the cover or had it open in another direction. In high velocity winds it acts like a sail and tries to rip off the bin. I've had to put a few latches on it to keep it down. Plus, with no rain getting to the pile, you have to be good about adding extra water to your compost. With every project, I learn something!

With the overall size of the bins and the way you access them, by pulling out all the front panels, it's somewhat difficult to turn the pile on a regular basis. For this reason we've been treating it as a "no turn" system. We fill one compartment at a time and then let it sit. After it’s had some time to decompose, we get in there once in a while and flip it, but overall we leave it alone. The first bin (all the way to the right) was filled up in roughly late September or early October, (at the height of the foliage season and our busiest period of guest visitors and leftover pancakes). Once the first bin was full, we closed it up started filling up the middle bin. There has been a definite change the compost process, and we’ve noticed how much it has slowed down over the winter. We’re hoping that when we get in there to turn it this spring, after it thaws, it will be ready to spread on the garden and replenish the soil. With our second bin filling up quickly we are ready to get going with projects in the garden!

Wire mesh protects the pile from furry guests and visitors who might want a midnight snack. The front slats slide out from the top, so we can turn the piles and spread it on the garden.

Wire mesh protects the pile from furry guests and visitors who might want a midnight snack. The front slats slide out from the top, so we can turn the piles and spread it on the garden.


This year, we’re going to start another type of composting project, utilizing the power and unique talents of worms. That's right, the little red squiggly guys you usually find on the end of fish hooks. They are super-efficient processors and they produce a sort of gold-quality fertilizer that can be turned into the garden to improve the soil.  One pound of worms can eat a half a pound of food scraps in 24 hours. By comparison, if we threw a pound of food scraps in our main compost it'd take several months to break down.


The addition of the worm farm changes our game, especially through the cold winter months at the B&B, when the outdoor compost bins slow down. Now, with the addition of the worm processing system, we have a back-up plan that will improve our compost recycling rates significantly! Plus, feeding the worms some of the food scraps will help us to strike a better balance, helping us to maintain an optimum ratio of food and plant material in the main compost bin. (Right now we are heavy on food scraps and light on "green stuff," meaning sticks, leaves, vegetation, etc.)  We are excited to see how these two systems can support each other and help us to produce high quality fruits, veggies and flowers in our garden that we can share with guests at the B&B.

The worm compost “worm casting” byproduct is coveted amongst gardeners, so we’re looking forward to building it into our recycling efforts on the farm. We are happy to welcome these little guys to the family. The only challenge is that ordering a pound of worms means we’ll be starting out with about 1,000 worms... what will we name them all!?

-Luke McCarthy

Serving up Fresh VT Maple Syrup from the B&B: Small Batch DIY Production

A quick trip into town yesterday made one thing blatantly obvious: Spring is coming and sugaring season is upon us! On the way to Bristol, it seemed like every other pickup truck had a 300 gallon tank in the back with Vermont Maple sap sloshing around as they shuttled the sweet stuff from the tree stands to their boiling location. The mountains around us have a faint fog of wood smoke mixed with the sweet aroma of sap steam as it reduces to Maple syrup.

Making sap while the sun shines!

The more intense producers around here have 2,000+ gallon sap tanks sitting at the bottom of their hillside tree stands and will come around daily with their transport vehicles and ferry the sap off to be produced. Then again, when you run 13,000 taps as one producer near us does, you need fairly large storage tanks! As humble beginners, we run a few less than that. 

Vermont has an interesting history of cultivation of its forests and farmland that we see hints of even today. When white settlers first arrived, the land was mostly heavily forested. Land clearing proceeded and sheep herding and wool production became the mainstay of Vermont settlers. By the 1840’s, Addison County (where we have our Bed and Breakfast) was the leading wool producing area in the United States (Agriculture in Vermont). Many of the towns nearby still show their history, with mill buildings set along the river ways that once powered their fabric production. During the second half of the 19th century, sheep farming began to decline and was gradually eclipsed by the dairy industry. (What Ceres Might Say) For the places that aren't farm land, the northern climate and abundance of Maple trees makes Vermont a perfect location for syrup production.


As recently as 20 years ago, our property and all the acreage around us was used primarily for farm land. The land was clear cut and used to graze dairy cows and support other farm operations, which opened up beautiful views to the mountains along all sides of our Bed and Breakfast. Since the farmers sold their cows, the trees and forests have started to fill in but we still have an amazing view of the Green Mountains.

As a Vermont Bed and Breakfast, we serve up a lot of Maple syrup to our guests. A weekend getaway in Vermont isn't complete without a breakfast menu item with that maple sweetness cultivated across the hills of Vermont. We’re now in the process of planning and cultivating our land to support our goals for the future and for our BandB. We would like to make all of our own sap but given the fact that it takes 30 years for a Sugar Maple tree to be old enough to tap, the pickins are slim for working the trees. We have planted some new saplings and hope to be producing more and more over the years.

Our Mobile Sap Collector

This year we have about 15 taps going which, as of yesterday, have given us about 15 gallons of sap. We have the capacity for about 30 more taps but because of the historical land clearing, our maple trees are so spread out we really haven’t discovered a good way of collecting the sap yet. (Don't worry, I've been looking at ATV's and Tractors... that problem will be fixed soon!) So for now, we are perfectly content sticking with tapping just the couple of trees close to the house and using our little 50 gallon mobile collection tank set up. 

Reducing the sap to syrup!


Given the fact that it takes about 40 gallons of sap to make one gallon of syrup, the 7 gallons of sap I boiled last night yielded just a few cups. We’ll need to make some time over the next few days to boil all 15 gallons. Boiling 7 gallons from last night took the better part of 6 hours to reduce in our little turkey fryer. We’re still learning and perfecting our set up. If everyone around us is working with thousands of gallons, and we are only working with tens of gallons, does that make our Syrup artisan? I like to think so... It just tastes better local!

DIY Small Batch Maple Syrup

-Luke McCarthy

Planning for Happy Hens & Fresh Eggs

Spring is coming, which means it's almost time for the baby birds to arrive at our local hardware store!  We are excited to be raising a roost, so we put our order in early. We picked out some of the best layers they had to offer. They will arrive just after hatching and we'll raise them by hand and heat lamp until they are ready to go outside and move into their new coop! 

Here's a desciption of the hens (and ducks) who will be living on the farm and contributing to the fresh breakfast menu items we offer at the B&B!

Rhode Island Reds - This is one of the most famous and all time popular breeds of truly American chickens. Developed in the early part of this century in the state of the same name, they have maintained their reputation as a dual purpose fowl through the years. Outstanding for production qualities, they have led the contests for brown egg layers time after time. No other heavy breed lays more or better eggs than the Rhode Island Reds. Our "production" strain is keeping up the fine reputation of this old favorite. Baby chicks are a rusty red color and the mature birds are a variety of mahogany red. (Murray McMurray Hatchery, The World’s Rare Breed Poultry Headquarters)

Golden Laced Wyandottes - The “ancestors” of Golden Laced Wyandottes originated in Wisconsin and were called Winnebagoes. By 1880 they received their present-day name. This variety is a beautiful combination of rich golden bay laced with lustrous greenish black. The general feather pattern is very similar to the Silver Laced Wyandottes. A beautiful bird for exhibition. (Murray McMurray Hatchery, The World’s Rare Breed Poultry Headquarters)

Silver Laced Wyandottes - The Silver Laced is the original Wyandotte and the other varieties were developed from it later with crosses on other breeds. It is an outstanding example of American poultry breeding ingenuity and is one of the most beautiful breeds we offer. It is colorful, hardy, and productive. The broad feathered, smooth fitting plumage is sharply marked. The general appearance is silvery white and lustrous greenish black as each feather is edged in a contrasting color. The close-fitting rose comb and good body size are valuable assets for winter laying. Cold weather doesn't seem to bother them at all as their hardiness and vigor keep them laying straight through the winter. They lay a nicely shaped, good sized egg, varying from light to rich brown and will set some. This is another excellent variety for exhibition. Baby chicks vary from almost black to light silvery gray and many have contrasting light and dark stripes on the back. (Murray McMurray Hatchery, The World’s Rare Breed Poultry Headquarters)

Araucanas - This unusual breed gets in name from the Indian tribe of Chile where they were first discovered.  Our chicks have some Araucana and some Ameraucana blood mixed and consequently are not for show but are beautiful chickens known for their ability to lay colored eggs of shades varying from turquoise to deep olive to shades of brown.  Each bird will typically lay a different shade of colored egg that will amaze your friends and make a wonderful "show and tell" type project for school.  Adults are of medium size with pea combs and our breeding stock are selected for their ability to produce colored eggs.  They exhibit a wonderful combination of colors and color patterns and 10 or 20 of these birds will make an absolutely beautiful laying flock that is extremely hardy and will be the talk of the town.  Baby chicks come in all colors, plain and fancy, just like the adults.  This is a unique breed and great fun to have when the colored eggs start coming.  (Murray McMurray Hatchery, The World’s Rare Breed Poultry Headquarters)

Golden Cornets - The Comet has been widely acclaimed in all areas of the world where brown eggs are preferred. The reason is simple. The Comet pullet is easily one of the finest brown egg layers available today. They mature early and lay eggs of excellent size and quality. She is an extremely quiet bird, that seems to be able to withstand the colder, non-insulated, laying houses of the small flock owner, better than most breeds. The Comet is a buff sex-link strain. The chicks may be sexed by color, pullets red-roosters white. When mature, the  Comet pullet is golden red in color, but has some white showing through in her neck and back. (Mt. Healthy Hatcheries)

Pekin Ducks - Originating in China in ancient times, White Pekins were brought to the Western World in the middle 1800’s. Their fine meat quality and egg laying ability quickly made them the first choice of American duck growers. Both the male and female are creamy white in color, yellow skinned, and very large breasted. The males carry a fall weight of 10 to 11 pounds and the females weigh 8 to 9 pounds. They are the easiest domestic ducks to pick and prepare for eating. (Murray McMurray Hatchery, The World’s Rare Breed Poultry Headquarters)

We look forward to sharing updates about our little brood's progress. We expect them to arrive in early May. It will take a little while for them to adjust and be ready to lay fresh eggs but we'll be happy to prepare some new breakfast recipes with eggs to keep the farm flavors fresh and local. 

- Luke & Carin McCarthy

Winter in Vermont: For the Birds

In the winter season, we put out bird feeders to help our feathered-friends weather through the wind and cold. With snow covering the ground, it can be challenging for New England birds to find adequate food in the winter, causing them to travel further while also requiring them to store up energy to keep warm.

Luke comes from a long line of bird watchers and when his Dad passed away last year, he left us a number of bird feeders. We've put them just outside the dining room, so our guests can enjoy the view and watch the visitors during breakfast. With this, feeding the birds has become a sort of honored communion and it’s something he puts extra care into.

Our dog Stout, checking out our guests at the birdfeeders.

Our dog Stout, checking out our guests at the birdfeeders.

With the relatively mild winter this year, our birds are getting a little extra fluffy with all of the delicious breakfast seeds they get from us. With the frequency of their visits to our birdfeeders, you might even say they are eating us out of house and home.

On the B&B menu for the birds; we serve up a mixture of suet and seeds, including sunflower, safflower, and thistle seed. With its popularity amongst the guests, Luke refills the sunflower seeds just about every other day.  The diverse variety of food, feeder shapes and fixtures attracts a wide variety of travelers who fly in to visit.

Of the birds that stick around the central Vermont mountains in the winter, we have a healthy flock of chickadees, blue jays, and cardinals. From time to time, we also see a red-bellied woodpecker, with his red tufted head, who seems particularly attracted to the suet mixture. Mourning doves, nut hatches and hermit thrushes are also frequent fliers here. 

This year, we were visited by volunteer leaders of the Christmas bird count, who excitedly reported that they had seen a Northern Shrike on our property. This rare species is the only carnivorous songbird. Unlike our other feathered guests, they frequent the birdfeeders in the hopes of dining upon a succulent little birdie. While we haven’t found any evidence of their feasting, we are excited to provide a healthy habitat for birds in our area. For those who are interested in participating, there’s another backyard bird count coming up on Valentine’s day weekend.

We have a lot to learn from our quiet neighbors and we’re excited to discover new species of birds and wildlife right in our backyard. We’re lucky to have the Green Mountain Audubon Center of Vermont location just a few miles away, in Huntington, VT. We suggest that our Bed and Breakfast guests visit and learn about the plants and animals that are native to central Vermont and check the Cornell Lab or Ornithology for guides of the birds of Vermont.

On our website, we list a map of great Vermont birdwatching sites. There are many rare species that can be found in the Green Mountains. Nature lovers may also enjoy taking some walks on suggested trails in birding territory.

Guests will note, our B&B is decorated with many hand-carved wooden birds that Luke’s Grandfather Bill “Bumpa” McCarthy made. Some even have Luke’s childhood handwriting on them, as they made them together in his woodshop.

We’re excited to continue the legacy of care that Luke’s Father and Grandfather have shown to their feathered neighbors and provide the birds the best food we can offer all winter long. We do have to be careful to pull the birdfeeders in before the spring thaw, or we’ll have bears coming by for breakfast!

  - Carin McCarthy


Vermont: Always a Good Bet...

Timing our sap collection and starting seeds in a bit of a gamble. We think we're lucky, win or lose!

There’s a lot to see and do in Vermont during the late winter months. From cheese tours, to breweries, visiting covered bridges and museums, or touring (and sampling) maple syrup production, there is something for all adventurers to taste and enjoy. So, don’t despair if you’ve planned your trip and the snow isn’t cooperating. We have lots of ideas about how to explore and enjoy the best of Vermont in this season. It’s a beautiful place in any season, and we feel lucky to live here and share it with guests who want to have a real getaway.

Cooking Up Some Projects on the Farm!

After a successful summer and fall season here at the B&B we've realized something: we go through a ton of eggs! We had always wanted to get a small flock of chickens but after going through so many eggs this year our plans have been moved up a little. While our new flock of baby chicks wont be here until early May, there is no time like the present to build them a nice and cozy home to live out their days. 

Read about the DIY build project and design.